Roman Numeral Converter
Il Progetto
Convertitore da numeri arabi a numeri romani sviluppato con JavaScript vanilla, validazione avanzata degli input e architettura basata su componenti. Un'applicazione completa con design Material Design 3 e sistema di commenti professionale.
Codice Sorgente
- index.html
- styles.css
- script.js
<!-- DESIGN
   ------
   * This HTML is characterized by:
   * - importing Roboto Slab and Roboto fonts from Google Fonts.
   *   I chose these fonts because Roboto Slab has classic shapes
   *   that evoke ancient Rome,
   *   Roboto (for input and button) provides modernity,
   *   readability and consistency with Material Design 3
   * - a div structure with exception of the card container, where
   *   I chose <main> for semantic purposes
-->

<!DOCTYPE html>
<html lang="en">
    <head>
        <title>Roman Numeral Converter</title>
        <meta charset="UTF-8" />
        <meta name="viewport" content="width=device-width, initial-scale=1.0" />
        <link rel="stylesheet" href="styles.css">
        <link rel="preconnect" href="https://fonts.googleapis.com">
        <link rel="preconnect" href="https://fonts.gstatic.com" crossorigin>
        <link href="https://fonts.googleapis.com/css2?family=Roboto+Slab:wght@100..900&family=Roboto:ital,wght@0,100..900;1,100..900&display=swap" rel="stylesheet">
    </head>

    <body>

        <!-- * freeCodeCamp instructions:
             * - You should have an input element with an id of "number".
             * - You should have a button element with an id of "convert-btn".
             * - You should have a div, span or p element with an id of output.

             * I'll create separate divs to allow me in CSS phase to position
             * each component exactly as in Figma

             * I must remember to write "number" for type of input to restrict
             * input to numeric characters, which is more efficient than using
             * regex in JavaScript
             * I did some research and found out that input type="number" uses
             * browser native validation operating with an underlying C/C++ engine,
             * while regex is executed by the JavaScript interpreter.
             * However, I still need to use JavaScript to avoid "e" and ","
        -->

        <main id="card-container">
            <div id="title-container">
                <h1 id="first-h1">Roman Numeral <span id="second-h1">Converter</span></h1>
            </div>
            <div id="output-container">
                <p id="output"></p>
            </div>

            <!-- * Adding min/max attributes provides defense in depth.
                 * Although this approach is typically used in more complex,
                 * cybersecurity scenarios, it provides a fallback in case JavaScript
                 * rule validation fails or is disabled.
            -->

            <div id="input-container">
                <input value="" type="number" name="arabic-number-input" class="number" id="number" placeholder="Enter a Number" min="1" max="3999" autocomplete="off">
            </div>
            <div id="convert-btn-container">
                <button id="convert-btn">Convert</button>
            </div>
        </main>

        <script src="script.js"></script>
    </body>

</html>
/* DESIGN
   ------
   * The structure I propose is a mix from Component-Based Architecture,
   * Utility-First Variables and Flat Component Hierarchy, for this reason:
   * - Component-Based Architecture because I organized it into components (card,
   *   title, output, input, button)
   * - Utility-First Variables because all changes (almost) are centralized
   *   in :root and organized as atomic terms (--button-width , --input-height).
   *   This approach made it very quick to create the media query for mobile
   * - Flat Component Hierarchy because the primary use of ID-based selectors
   *   predominates
*/


:root {

    /*  * I have an internal conflict:  follow DRY rule or add same property in
        * all component which avoids the DRY rule? With the first approach I would
        * guarantee for anyone to understand exactly which property to modify for
        * each specific element
    */


    /* Background */

    /* * When exporting the background I created in Figma (with Material 3 shapes
       * and Android logo), SVG was 56KB, PNG 175KB, and JPEG 441KB.
       * PNG is lighter than JPEG because geometric shapes and flat colors compress
       * better with PNG's lossless algorithm, while JPEG is optimized for photographs
       * with continuous gradients
   */
    --background-image: url("https://github.com/user-attachments/assets/a44f66ec-c760-4df1-8ac4-3afa104c4ebb");

    /* Position */
    --title-margin-top: 65px;
    --output-margin-top: 150px;
    --output-margin-top-alert-1: 134px;
    --output-margin-top-alert-2: 138px;
    --input-margin-top: 261px;
    --button-margin-top: 349px;

    /* Card */
    --card-color: #13140D;
    --card-size: 480px; /* perfect square, use it for width and height */
    --card-border-radius: 28px;


    /* title and output*/
    --title-output-font-family: "Roboto Slab", sans-serif;
    --title-output-font-color: #FFF;

    /* title */
    --title-font-size: 28px;
    --title-font-weight: 400;
    --title-font-color-secondary: #C7C8B9;


    /* output */
    --output-font-weight: 800;
    --output-font-size: 48px;
    --output-font-size-alert-1: 32px;
    --output-font-size-alert-2: 28px;
    --output-padding-alert: 0 48px;


    /* input and button */
    --input-button-font-family: "Roboto", sans-serif;

    /* input */
    --input-font-weight: 400;
    --input-font-size: 16px;
    --input-width: 210px;
    --input-height: 56px;
    --input-border-radius: 4px 4px 0 0;
    --input-box-color: #23241B;
    --input-border-bottom: 2px solid #444830;
    --input-border-bottom-active: 2px solid #71774f;
    --input-font-color: #CED2B3;


    /* button */
    --button-font-size: 18px;
    --button-font-weight: 500;
    --button-font-weight-active: 400;
    --button-width: 156px;
    --button-height: 56px;
    --button-border-radius: 28px;
    --button-font-color: #2B3400;
    --button-box-color: #BFCD7F;
    --button-box-color-hover: #CFDD8B;
    --button-border-radius-active: 16px;
}


body {
    background-image: var(--background-image);
    background-size: cover;
    background-position: center;
    background-repeat: no-repeat;
    background-attachment: fixed;
}

#card-container {
    background-color: var(--card-color);
    width: var(--card-size);
    height: var(--card-size);
    border-radius: var(--card-border-radius);
    position: absolute;
    top: 50%;
    left: 50%;
    transform: translate(-50%, -50%);
    display: flex;
    flex-direction: column;
    align-items: center;
    text-align: center;
}

#title-container {
    margin-top: var(--title-margin-top);
    position: absolute;
}

h1, #output {
    font-family: var(--title-output-font-family);
}

#first-h1, #output {
    color: var(--title-output-font-color);
}

h1 {
    margin: 0;
    font-size: var(--title-font-size);
    font-weight: var(--title-font-weight);
}

#second-h1 {
    color: var(--title-font-color-secondary);
}

#output-container {
    position: absolute;
}

#output {
    margin: 0;
    margin-top: var(--output-margin-top);
    font-weight: var(--output-font-weight);
    font-size: var(--output-font-size);
    color: var(--title-output-font-color);
}

#output.empty {
    color: var(--title-font-color-secondary);
}

#output.alert-1, #output.alert-2 {
    padding: var(--output-padding-alert);
    color: var(--title-output-font-color);
}

#output.alert-1 {
    margin-top: var(--output-margin-top-alert-1);
    font-size: var(--output-font-size-alert-1);
}

#output.alert-2 {
    margin-top: var(--output-margin-top-alert-2);
    font-size: var(--output-font-size-alert-2);
}

#input-container {
    margin-top: var(--input-margin-top);
    position: absolute;
}

#number, #convert-btn {
    font-family: var(--input-button-font-family);
}

#number {
    width: var(--input-width);
    height: var(--input-height);
    box-sizing: border-box;
    font-weight: var(--input-font-weight);
    font-size: var(--input-font-size);
    text-align: center;
    color: var(--input-font-color);
    border-radius: var(--input-border-radius);
    background-color: var(--input-box-color);
    border: none;
    border-bottom: var(--input-border-bottom);
    outline: none;
    transition: border-bottom-color 0.15s ease;
}

#number::placeholder {
    color: #ced2b36b;
}

#number:focus {
    border-bottom: var(--input-border-bottom-active);
}


#convert-btn-container {
    margin-top: var(--button-margin-top);
    position: absolute;
}

#convert-btn {
    width: var(--button-width);
    height: var(--button-height);
    border: none;
    font-weight: var(--button-font-weight);
    font-size: var(--button-font-size);
    color: var(--button-font-color);
    border-radius: var(--button-border-radius);
    background-color: var(--button-box-color);
    cursor: pointer;
    transition: background-color 0.15s ease;
}

#convert-btn:hover {
    background-color: var(--button-box-color-hover);
}

#convert-btn:active {
    border-radius: var(--button-border-radius-active);
    font-weight: var(--button-font-weight-active);
}

@media (max-width: 768px) {
    :root {

    /* Position */
    --title-margin-top: 51px;
    --output-margin-top: 117px;
    --output-margin-top-alert-1: 103px;
    --output-margin-top-alert-2: 107px;
    --input-margin-top: 199px;
    --button-margin-top: 265px;

    /* Card */
    --card-size: 360px; /* perfect square, use it for width and height */
    --card-border-radius: 21px;

    /* title */
    --title-font-size: 20px;

    /* output */
    --output-font-size: 32px;
    --output-font-size-alert-1: 24px;
    --output-font-size-alert-2: 20px;

    /* input */
    --input-font-size: 14px;
    --input-width: 157px;
    --input-height: 42px;
    --input-border-radius: 3px 3px 0 0;


    /* button */
    --button-font-size: 16px;
    --button-width: 117px;
    --button-height: 42px;
    --button-border-radius: 21px;
    --button-border-radius-active: 9px;

    }
}
/* DESIGN
   ------
   * After different paradigm changes, this is the most concise
   * JavaScript solution I managed to create.
   * It is characterized by:
   * - declaration based on name required from freeCodeCamp
   * - arabic to roman map for more efficiency with a single-source
   *   declaration
   * - a short while loop that "translates" arabic numbers to roman
   *   numerals
   * - the logic is simple, with .reduce JavaScript takes each
   *   array value and accumulates all the results that come out
   *   of the loop, we start from "" (empty string) which is the
   *   the second argument.
   *   Writing [arabicNumber, romanNumber] we are destructuring the
   *   array.
   *   Inside the while loop we say to JavaScript: as long as the
   *   user's input number is big enough to contain this Roman number,
   *   continue the iteration.
   * - Next, we handle everything related to input, so the logic of
   *   allowed input, allow clicking the enter button to submit.
   *   I modify the default behavior of keyboard with an e.preventDefault(),
   *   which doesn't even let you write values that aren't numeric, in order
   *   to improve the UX,
   *   and finally assign convert button to the user input checking function
*/


/*  * JavaScript must avoid "e" and "," in the input label

    * I need to assign number, convert-btn and output
    * to the equivalent id
    * and have the following text as alert if nothing is entered
    * in the input field: "Please enter a valid number"
*/


const numberInput = document.getElementById("number");
const convertBtn = document.getElementById("convert-btn");
const output = document.getElementById("output");
output.textContent = "------"; // Without this default value we have a perceptual void
output.classList.add("empty"); // With this class we have a duller color, because default value it must symbolize a dull value

/*  * It is more efficient to create a unique map than two split
    * arabicNumber and romanNumber
    * This approach makes possible the next DRY function
*/

const arabicToRomanMap = [[1000, "M"], [900, "CM"], [500, "D"], [400, "CD"], [100, "C"], [90, "XC"], [50, "L"], [40, "XL"], [10, "X"], [9, "IX"], [5, "V"], [4, "IV"], [1, "I"]];


/*  * After a long time to create for loops and switch statements,
    * I realized (with my code tutor) that there is a simple
    * way to get the same result which perfectly matches with
    * DRY principle (Don't Repeat Yourself)
*/

const arabicToRoman = (number) => {
    return arabicToRomanMap.reduce((result, [arabicNumber, romanNumber]) =>{
        while (number >= arabicNumber) {
            result += romanNumber;
            number -= arabicNumber;
        }
        return result;

    }, "");
}


/*  * Following SRP rule (Single Responsibility Principle)
    * I'll create a checker of input that has as only function
    * "bounce" not appropriate input
    * I'll start by not allowing any character different from decimal
    * number, then I'll write a clear checker of user input
    * arrow function
*/

    numberInput.addEventListener("keydown", (e) => {
        if (["e", "E", "+", "-"].includes(e.key)) {
        e.preventDefault();
        }
    });

    numberInput.addEventListener("keydown", (e) => {
        if (e.key === "Enter") {
            checkUserInput();
        }
    });

const checkUserInput = () => {
    const inputInt = parseInt(numberInput.value, 10); // I wrote 10 to specify that it is a decimal number
    output.classList.remove("alert-1", "alert-2", "empty") // Let's reset special cases and removing empty class now we have a lit value as a result

    if (!numberInput.value || isNaN(inputInt)) { // Then if there is no user input value or it is not a numeral value
        output.textContent = "Please enter a valid number";
        output.classList.add("alert-1");
        return;
    }

    if (inputInt < 1) {
        output.textContent = "Please enter a number greater than or equal to 1";
        output.classList.add("alert-2");
        return;
    }

    if (inputInt > 3999) {
        output.textContent = "Please enter a number less than or equal to 3999";
        output.classList.add("alert-2");
        return;
    }

    const romanConverted = arabicToRoman(inputInt);
    output.textContent = romanConverted;
};

convertBtn.addEventListener("click", checkUserInput);
L'Arte dei Commenti
Incredibilmente ho pochissime cose da dire in merito a questo progetto, perché ho detto tutto nei commenti. Ciononostante, quei commenti sono per i programmatori che leggono, questi README sono per tutti.
Dopo aver interiorizzato l'articolo di Salvatore Sanfilippo (https://antirez.com/news/124) è come se in questo progetto avessi scritto i commenti per la prima volta. Precedentemente li utilizzavo soltanto nel CSS per suddividere i diversi componenti. Questa volta ho integrato i commenti di design (design comments) nonché il lungo commento introduttivo che spiega l'architettura del file, in modo tale da permettere a chi lo leggerà di avere fin da subito un'infarinatura generale. Questo è utile in progetti lunghi, nel mio caso ho aggiunto questo tipo di commento anche nell'HTML ma riconosco che per file così piccoli sia alquanto inutile, nonostante ciò, dato che voglio esercitarmi fin da subito, ho deciso di aggiungerlo.
I "Why Comments"
Ho trovato strabilianti i "why comments" nonché tutti quei commenti che spiegano le ragioni per le quali si è optato per una scelta piuttosto che l'altra e se questa è molto banale allora spiegare il perché è stata la scelta migliore in quel momento. Dico strabilianti perché mi hanno costretto a riflettere e documentarmi molto per poter affermare certe scelte. Questo mi ha dato una comprensione che non avrei mai potuto ricevere scrivendo solo codice.
I "Trivial Comments" con Cultura
Poi arrivano i trivial comments, che dovrebbero essere tutti quei commenti dedicati a concetti che qualsiasi programmatore dà per scontato, ma che Salvatore Sanfilippo dice comunque di amare. Ho voluto aggiungere un pizzico di cultura all'interno.
Ad esempio nell'HTML a un certo punto affermo: "I did some research and found out that input type="number" uses browser native validation operating with an underlying C/C++ engine, while regex is executed by the JavaScript interpreter."
O ancora: "Adding min/max attributes provides defense in depth. Although this approach is typically used in more complex, cybersecurity scenarios, it provides a fallback in case JavaScript rule validation fails or is disabled."
Due concetti del tutto inutili da includere per un qualsiasi programmatore, ma pur sempre concetti che vale la pena rileggere. Per esempio io, assoluto principiante, sarei felicissimo di trovare commenti simili nel progetto di qualcun altro.
I "Checklist Comments"
Successivamente ho aggiunto dei commenti di monito, Salvatore li chiama "checklist comments" ovvero commenti che mi sono serviti per ricordare esattamente cosa diceva nelle istruzioni freeCodeCamp e non esagero se affermo che è proprio grazie a questi se sono riuscito per la prima volta a passare al primo tentativo un certification project.
Il Design: Material Design 3
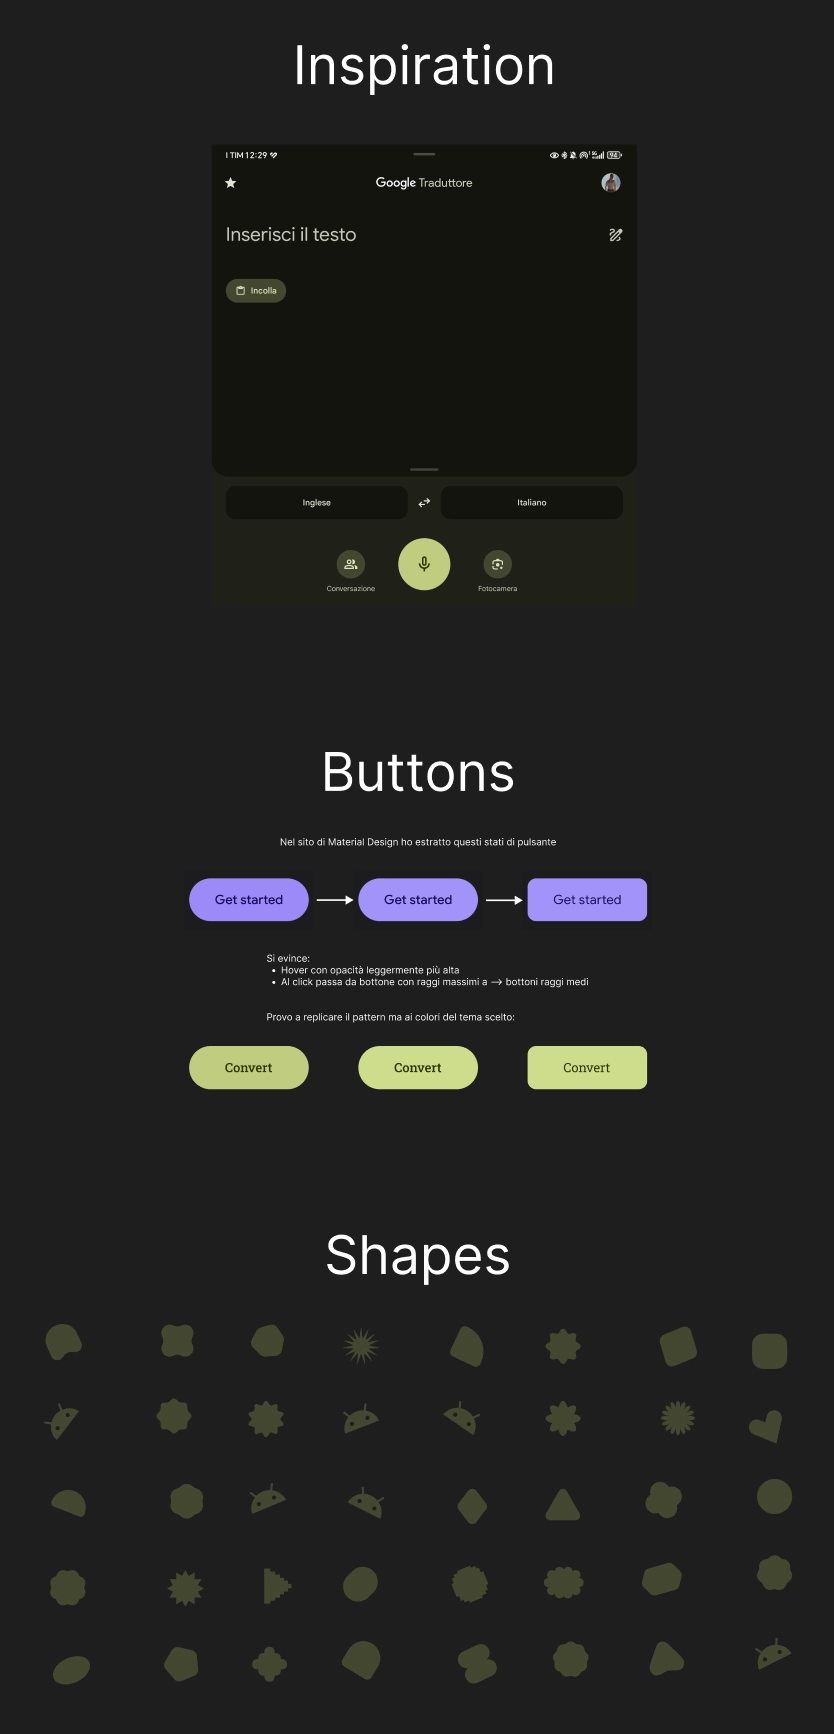
Parliamo ora del design di questo progetto. Questa volta ho scelto di addentrarmi nel mondo del Material Design 3.
Mi sono ispirato dall'applicazione Google Translate del mio smartphone, mi è sempre piaciuto lo stile, seppur "acido" trovo il suo stile unico. Ho iniziato a studiare questa corrente di design e dopo aver ottenuto un'infarinatura generale da un video YouTube, mi sono dedicato all'esplorazione del sito ufficiale. Qui ho ottenuto tutte le risposte, dallo stile e scelte stilistiche a un file Figma con tutti i componenti principali.
Ho preso da questo le varie "shapes", ovvero tutte le forme del Material Design 3 e le ho sparse sullo sfondo, aggiungendoci un emoji che raffigura Android, anche quest'ultima presa dal sito Material.
Un Nuovo Approccio: Note a Fianco
In seguito, un'immagine delle note che ho scritto a fianco al progetto per aiutarmi. Non avevo mai adottato questo approccio. Salvatore è persino riuscito a cambiare il mio modo di usare Figma?
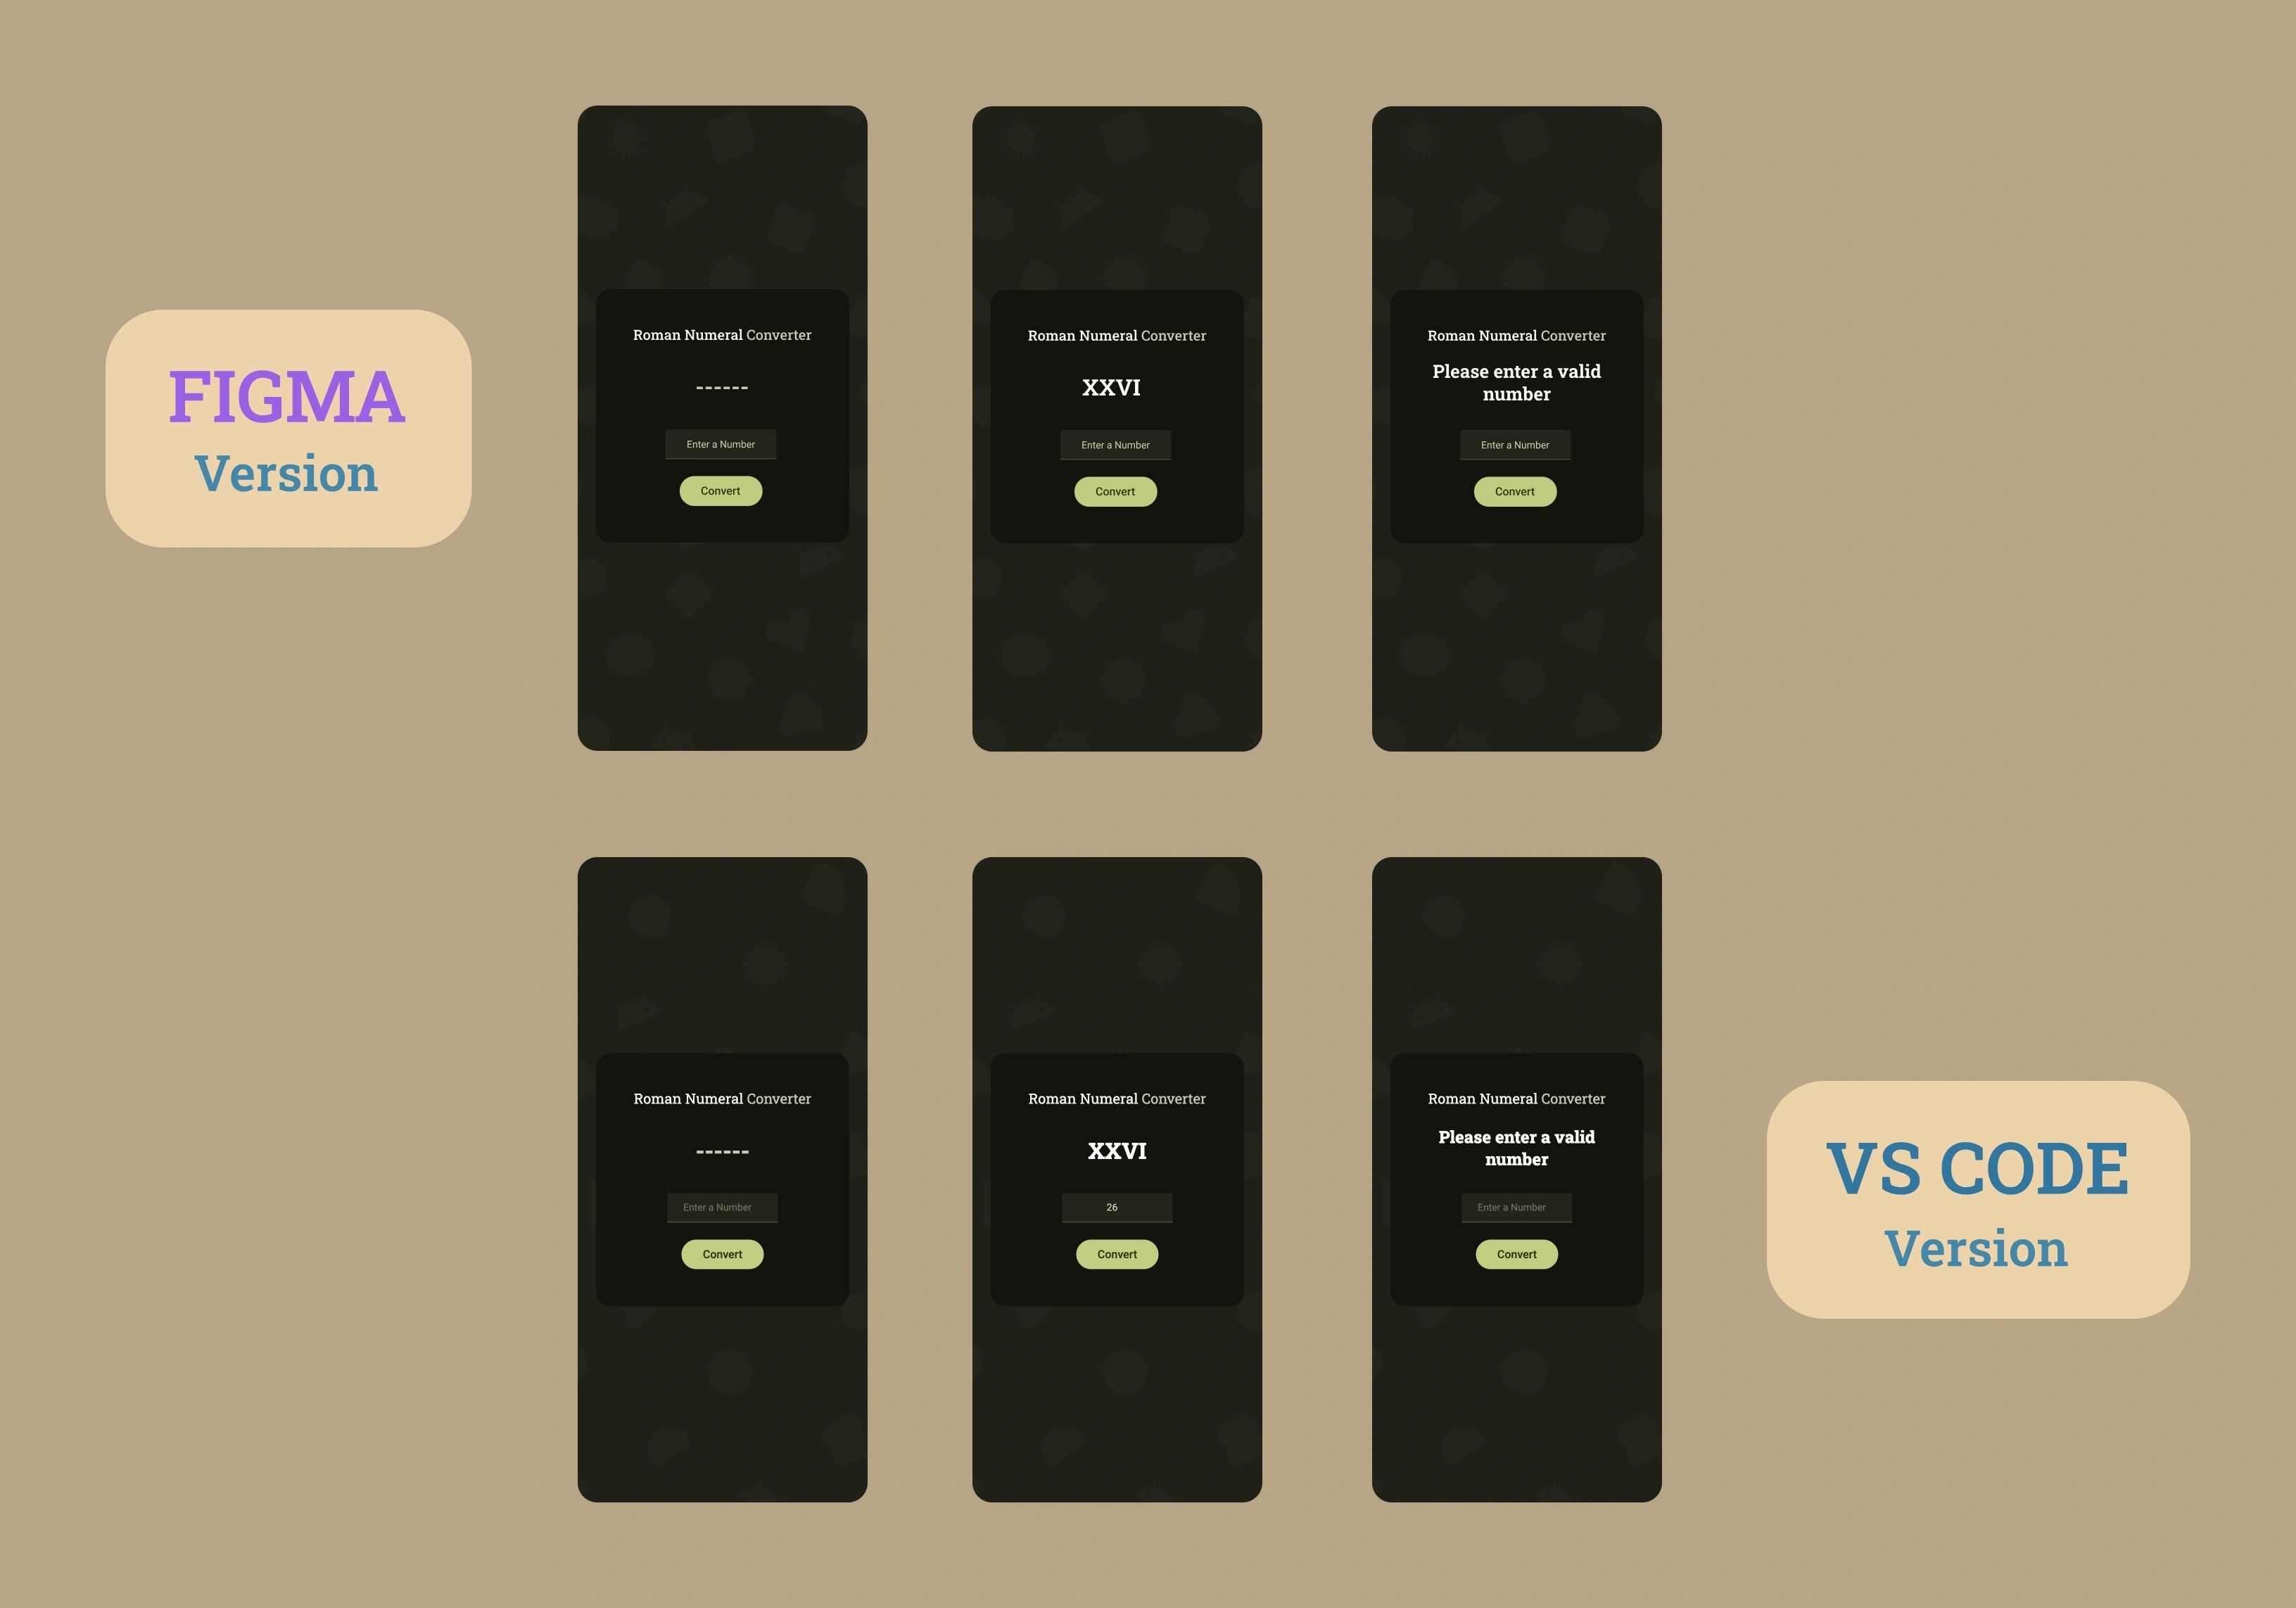
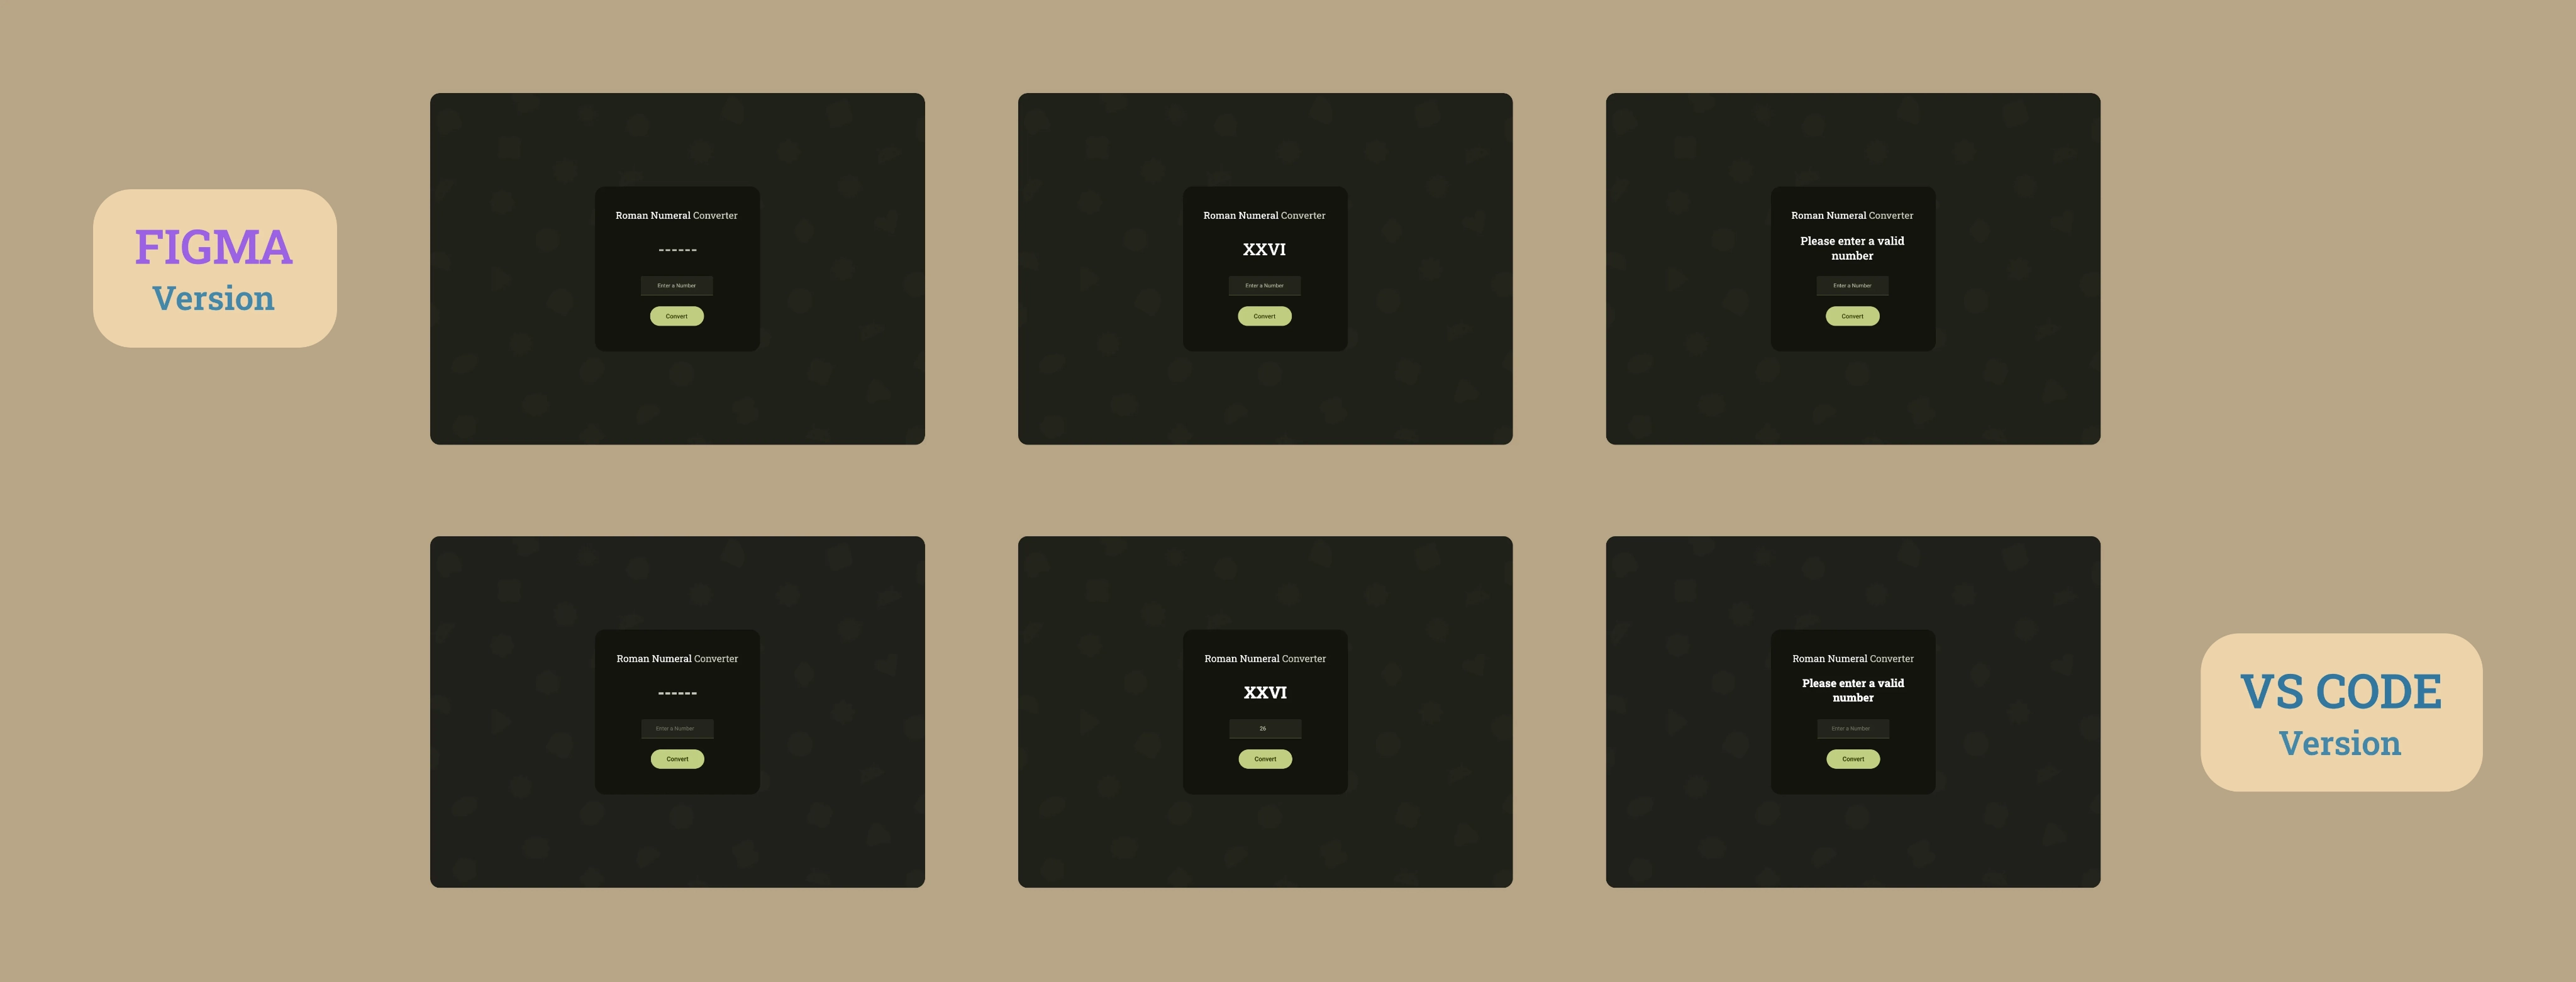
Reinterpretazione Personale dello Stile
Mi sono preso la libertà di reinterpretare questo stile. Infatti al box dell'input ho deciso di posizionare il placeholder centrato orizzontalmente anziché allineato a sinistra, con un'opacità leggermente più alta di come avrebbe fatto Google ed allo stesso tempo di un colore analogo al tema complessivo. Inoltre ho inserito dei trattini, per la precisione 6, che vengono mostrati all'apertura dell'applicazione, prima di ottenere l'output. Google non l'avrebbe mai fatto, l'avrebbe piuttosto lasciato vuoto per sottolineare che quel campo si sarebbe riempito con la call to action da parte dell'utente (la pressione del pulsante "Convert").
Tutte queste scelte le ho fatte per una mera questione estetica, mi hanno portato alla sensazione che così fosse tutto al posto giusto.
Tipografia: Roboto Slab e Roboto
Al di là dello stile, ho anche conservato il tipico pattern di coerenza che Google dedica agli elementi interattivi (input, pulsanti) i quali devono essere immediatamente riconoscibili. Per questo motivo ho optato per il font Roboto Slab per il titolo e per l'output, che ha avuto come obiettivo quello di invocare caratteri classici, affini all'antica Roma, una sorta di "accento tematico". Mentre per input e button il font Roboto che segue modernità, ha ottima leggibilità e segue pattern consolidati che l'utente conosce, caratteristiche centrali nella filosofia di Google.
Cosa Ho Imparato
Architettura CSS Avanzata:
- Component-Based Architecture per organizzazione in componenti (card, title, output, input, button)
- Utility-First Variables con centralizzazione in
:root - Flat Component Hierarchy con selettori basati su ID
- Media queries responsive per mobile
Algoritmo di Conversione:
- Array map con coppie arabo-romano
[[1000, "M"], [900, "CM"]...] .reduce()per accumulazione risultati- While loop per iterazione sui valori romani
- Destructuring array per codice conciso
Input Validation Professionale:
type="number"per validazione nativa del browser (C/C++ engine)min/maxattributes per defense in depthe.preventDefault()per bloccare caratteri non numerici- Gestione casi edge: valori vuoti, NaN, range non validi
Event Handling:
addEventListener("keydown")per controllo caratteri- Enter key per submit alternativo
.includes()per blocco caratteri specifici (["e", "E", "+", "-"])
Best Practice Commenti:
- Design comments per architettura generale
- Why comments per spiegare scelte tecniche
- Trivial comments con approfondimenti culturali
- Checklist comments per requisiti freeCodeCamp
Material Design 3:
- Shapes e componenti Material
- Color system con palette tematiche
- Typography hierarchy (Roboto Slab + Roboto)
- Interactive states e transitions
Principi di Programmazione:
- SRP (Single Responsibility Principle)
- DRY (Don't Repeat Yourself)
- Defense in depth approach
- Semantic HTML
Riflessione
Salvatore Sanfilippo mi ha insegnato che i commenti non sono un peso, ma un'arte. Ogni scelta tecnica ha una ragione, ogni alternativa scartata ha un perché. Documentare questo processo non è perdere tempo, d'altronde mi ha portato a superare per la prima volta un certification project al primo tentativo.
Prossimo Progetto: Imparare le espressioni regolari costruendo uno Spam Filter